Bexar County Master Gardener event Feb. 16th 1pm-3pm
9 FebRedWorm Composting: Thanks for your participation this past weekend.
25 JulThank you to all who came out to the San Antonio Botanical Garden this weekend. I have included some links and attachments to dig a little deeper into some of the topics we covered on Saturday.
Worm Handout pdf
Links:
• Care of worms– what to do when you get your worms.
• Harnessing the Earthworm – by Thomas J. Barrett
• Adding worms to your raised bed
• In ground bin
•Harvesting Worm Castings- My harvester
Thanks again to all who participated and to Sasha Kodet and the San Antonio Botanical Garden. Let me know if you have any questions, or if I can give you some feedback on your set up.
KyleHarrell@hotmail.com
210-310-5046
http://www.TexasRedWorms.com
Composting with Red Worms 10:00am this Saturday at the San Antonio Botanical Garden
20 JulJoin TexasRedWorms.com at the San Antonio Botanical Garden this Saturday, July 23 at 10:00 am. We will be teaching how to set up your own red worm composting bin, and how to compost with worms. Learn how to turn your kitchen waste into rich worm castings that will condition the soil, and fertilize your plants naturally.
Composting with Red Worms
10 am—noon. Start turning your waste into rich worm castings for your garden and plants. Red Worm composting from
TexasRedWorms.com will show you how to make your own worm bed and bin, how to feed, care for, and harvest your own steady supply of worm castings. Limit 30 participants. Fee: $20. To register, please contact Sasha Kodet at 210.207.3270 or sasha.kodet@sanantonio.gov.
Easy DIY In ground Worm Composting Bin
21 MayWith a few minutes and fewer tools you can set up your own red worm composting system in any raised bed.
Materials:
Tin snips or box cutter
Plastic planter or bucket
Shovel or other digging tool
Stone or cover for the in ground bed
Find an old plastic planter and cut the bottom out.
Find a well drained spot that is protected from afternoon direct sun. Dig a small hole big enough to bury the upside down container. Add some shredded paper products and some compost. Moisten your mix and add worms. Cover w/ a paver or stone to keep out critters, and protect from elements.
Depending on the amount of worms, a handful of kitchen scraps every week or so will be plenty to start. As your worms grow and reproduce they will require more frequent feedings. Do not over feed. Be patient and when the food is processed by the worms, add a few more kitchen scraps. Keep an eye on moisture. If kept out of direct sunlight, the food scraps will usually provide enough moisture for your worms. Worms like it wet because they breathe through their skin, but will drown in standing water.
DIY Worm Trough
28 AprI had been thinking of building a feed trough style worm bed for some time. I found some plastic 55 gallon drums on Craigslist. My dad had some pine 2X4s cut from his saw mill, and we were in business. We began by cutting the 55 gallon plastic drums in half w/ a skill saw.
Materials: (2X4s, plastic 55 gallon drums, 3 inch wood screws, roofing screws, Thompson’s water seal)
Add Alabama Jumpers, Red Worms to your soil or raised bed.
19 Apr
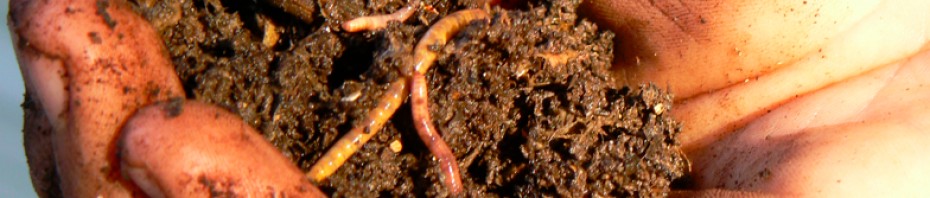
When your worm order arrives here is one way to add them to your garden, raised bed, soil. Your TexasRedWorms.com farm is a great place to raise your worms, but soon you will need to harvest the worms in order to make room for more. You can use all or a portion of your worms. In this example I am adding a box of Alabama Jumpers or as I like to refer to them “Texas Jumpers” to a raised bed I have prepared.
1. Choose a location preferably a shady spot that you can keep somewhat moist. If you are adding to a full sun area be sure to cover with a few inches of mulching material to protect from the sun and to retain moisture. Leaves, newspaper, straw will work fine. Morning or evening are the best time to add your worms.
2. Pre-wet the area you have chosen to prepare a nice moist environment for your worms to settle in.
3. You will need to dig a small hole about the size and depth of the box or container of your worms and contents.
4. Empty contents worms and compost into the hole.
5. Cover with a section of wet newspaper. This will keep the worms cool and protected from drying out giving them an opportunity to settle in to their new home. The Alabama Jumpers will eventually spread out on their own. Red Worms and European Nightcrawlers will stay were they are fed and are not going to spread like the tunneling Jumpers. In the event you are adding Red Worms or European Nightcrawlers you will add a handful of kitchen scraps to the same location you placed your worms every few days. As your worm population grows you will learn how often to feed based on how fast they work through the organic material. The Alabama Jumpers are great for aerating and fertilizing the soil. Red Worms and European Nightcrawlers are better composting worms.
For added protection I covered the newspaper with some leaves. This method is one I have used with success, I have included some other similar worm bed set up links I have used. Have fun and send us ideas. Let us know if you have any questions.
Worm Tubes, Worm Pit, Outdoor Worm Bed, Flow Through Worm Bin.
Worm Composting Bins and Garden Worm Tubes
31 MarBrian in San Antonio was kind enough to share some pictures of his worm tubes that he placed under the eves of his home and buried about 18″. He drilled several holes in the bottom 18″ buried portion of the pipe for drainage.
I just wanted to thank you for your help and encouragement starting worm composting. I went ahead and mixed 50-50 cow manure and peat moss in my tube and added a hand full of your red worms, and built a two bin system for the rest of the worms. two worm I added to my potted pineapple plant as an experiment. I figured I’d let the worms settle in for 3-7 days before adding vegetable mater. take a look at my pictures and let me know what you think. thanks again brother. BRIAN
Here are some more pics of his two bin system.
Above: drainage bin to catch excess moisture from worm composting bin.
Thanks to Brian in San Antonio for sharing your pics and ideas.
Let us know if you have any questions about composting w/ worms. Red Worms, European Nightcrawlers, and Alabama Jumpers available at TexasRedWorms.com for composting, gardening, and fishing. For more tips on what to do when you receive your worms check out our Care of Worms section.
Make your own worm pit.
25 MarDue to a lack of morning or afternoon sun, I had a difficult time growing anything in this flower bed. What began about three years ago as a compost pile would be converted into a worm pit.
First, I dug out some of the existing soil that was mostly clay and caliche (rock). I dug out about 18″ and began filling w/ organic matter. I began adding coffee grounds, horse and cow manure, grass clippings, leaves, and other vegetable waste. I didn’t add worms until about this time last year. Adding the worms at this point, gave the organic matter plenty of time to break down, and provide a rich environment for the worms. The worms have flourished and every handful yields a good many worms. I have continued to add compost material, and water as needed to keep the bed moist. Over the last month or so, the live oaks have given us a ton of leaves, and I have added them to the top layer as a mulch. You can use newspaper, hay, or other kinds of mulch to keep the worm bed from drying out. A layer of mulch will also keep the worms cool in the summer and warm in the winter. This particular worm pit I am raising Alabama Jumpers, but is suitable for other species, red worms, European nightcrawlers, and African nightcrawlers.
Worm Castings: the Best Fertilizer for the Garden
16 Mar
Spring time means it’s time to plant. The whole family pitched in helping my parents with the garden. My niece and dad are pictured above planting the watermelons. I supplied the worm castings, and a little hoeing to help out.
Worm castings are one of the benefits to raising your own worms. Composting food waste with worms will give you your own organic fertilizer. All natural fertilizer that strengthens roots of plants, improve disease resistance, and makes better tasting vegetables. Check out these links for additional information and benefits from gardening with worm castings.
We’ll be looking forward to some more tasty vegetables from the garden this year.


