Orlando Cortinas, Landscape Maintenance Technician for Villa Finale in the historic King William district in San Antonio, TX is doing some tremendous work on the museum grounds. He is bringing this historic property back to life, and working on some exciting organic methods to gardening and landscaping. Orlando has built a beautiful worm composting pit, and another composting bin for leaves, yard clippings, and food waste.
On my tour of the grounds, Orlando showed me his plans for a greenhouse, and compost tea brewer. Thanks Orlando, and the National Trust For Historic Preservation for your purchase with TexasRedWorms.com and the tour of your impressive property.
The first National Trust Historic site in Texas, this former home of preservationist and civic leader Walter Mathis was purchased in 1967. This home originally built in 1876 is now a museum, and a nearly 2 acre showcase along the San Antonio River on former Alamo farm lands.
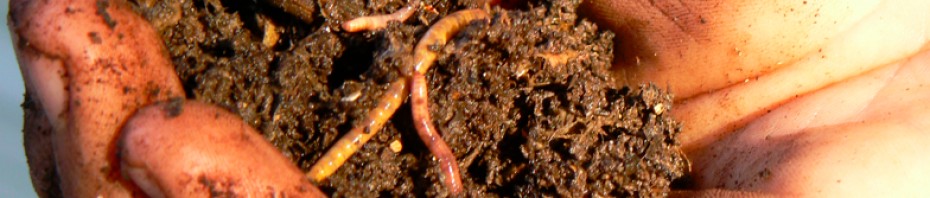
Brian in San Antonio was kind enough to share some pictures of his worm tubes that he placed under the eves of his home and buried about 18″. He drilled several holes in the bottom 18″ buried portion of the pipe for drainage.
I just wanted to thank you for your help and encouragement starting worm composting. I went ahead and mixed 50-50 cow manure and peat moss in my tube and added a hand full of your red worms, and built a two bin system for the rest of the worms. two worm I added to my potted pineapple plant as an experiment. I figured I’d let the worms settle in for 3-7 days before adding vegetable mater. take a look at my pictures and let me know what you think. thanks again brother. BRIAN
Here are some more pics of his two bin system.
Above: drainage bin to catch excess moisture from worm composting bin.
Thanks to Brian in San Antonio for sharing your pics and ideas.
Let us know if you have any questions about composting w/ worms. Red Worms, European Nightcrawlers, and Alabama Jumpers available at TexasRedWorms.com for composting, gardening, and fishing. For more tips on what to do when you receive your worms check out our Care of Worms section.
Due to a lack of morning or afternoon sun, I had a difficult time growing anything in this flower bed. What began about three years ago as a compost pile would be converted into a worm pit.
First, I dug out some of the existing soil that was mostly clay and caliche (rock). I dug out about 18″ and began filling w/ organic matter. I began adding coffee grounds, horse and cow manure, grass clippings, leaves, and other vegetable waste. I didn’t add worms until about this time last year. Adding the worms at this point, gave the organic matter plenty of time to break down, and provide a rich environment for the worms. The worms have flourished and every handful yields a good many worms. I have continued to add compost material, and water as needed to keep the bed moist. Over the last month or so, the live oaks have given us a ton of leaves, and I have added them to the top layer as a mulch. You can use newspaper, hay, or other kinds of mulch to keep the worm bed from drying out. A layer of mulch will also keep the worms cool in the summer and warm in the winter. This particular worm pit I am raising Alabama Jumpers, but is suitable for other species, red worms, European nightcrawlers, and African nightcrawlers.
Thanks to Chris from Arkansas who sent in a great video question via email.
My response:
Looks like a great spot to build a worm bed. (Pick a shaded area that can be kept moist, well drained, with decaying organic matter.)
You can do either:
If you bury your plastic bin, be sure the bottom of the tub is either removed or has lots of good sized drainage holes. You could also dump the contents of your plastic bin into the flower bed. For added protection from drying out, and critters you can cover with a few layers of damp newspaper, cardboard, straw, mulch, old carpet, or plywood.
Or you can do both:
Bury your red wiggler bin. Use the rest of the space for European nightcrawlers (Eisenia hortensis), or other species. By building up organic matter you can attract your native earthworms and/or supplement with some purchased worms. You can keep tabs on your red worm population, and watch the locals come to feed. I have done this in a couple of flower beds, and it seems to work well. The red worms will not stray and stay close to the food source. The earthworms (European nightcrawlers) tend to spread out more which is great for surrounding soil. Keeping your bed moist and full of organic matter will attract them and keep a fair amount close to home.
Hope that helps.
Red Worms– (Eisenia foetida) top feeders, composting worms, extremely prolific.
European Nightcrawlers– (Eisenia hortensis) deeper feeders, great for aerating lawn and garden, can also be used for composting.
Both Red worms and European nightcrawlers can be used to reduce household waste, accelerate the composting process, as well as, add nutrient rich natural fertilizer to plants, grass, and garden.
Inspired by Bruce’s flow through worm bin design at wormcompostingblog.com, and Cassandra Truax’s podcast interview w/ “worm dude” Jerry Gach. I had some plastic buckets laying around, and decided to build a couple for myself.
I cut out the hole w/ tin snips.
Holes were spaced 1.5″ apart to thread weed eater line through using a 1/8″ drill bit.
The first layer (6 sheets of damp newspaper).
Next, I added some red worms, and layered some partially finished compost for bedding.
I will add food scraps to the top and cover with some cardboard. The idea is that in a few weeks the worms will continue to work their way to the top and the finished vermicompost will flow through the weed eater line to be harvested from the bottom of the bin.
Inspired by Bentley Christie’s 4 worm experiment where his 5 1/2 month experiment with 4 mature worms rendered 12 adults and 94 juveniles. I began a similar experiment of 2 bins with 4 worms and my normal bedding.
11-14-10 I set up up two starter bins w/ bedding and 4 mature red worms.
12-5-10 Three weeks into the experiment I did a pretty good count in one of the bins and was able to find the 4 original worms and 4 juveniles. I was also able to find a few cocoons. I could have easily missed counting due to the small size of juvenile worms .
From everything I can gather a mature worm can produce an egg sac every 7 days, and reach sexual maturity in 60-90 days. The two main variables I would like some data on are: 1) time it takes a cocoon to hatch? 2) number of worms in cocoon?
I have read cocoons can hatch 3-30 baby worms, and assume healthier worms in ideal conditions will hatch more. Accurate numbers will require accurate counting, and isolating variables.
I recognize that calling this an “experiment” is a bit of a stretch but wanted to see what would happen.
Last week, as an experiment I stocked a starter bin with bedding and 10 red worm cocoons or egg sacs. I would love to be able to see the little rascals hatch, but as you will see in the next post, counting these little critters can be pretty difficult. Stay tuned.
When setting up a new bin it is helpful to add a handful of sand. This will help aid in the red worms digesting of food. The sand will provide the necessary grit in their gullet to help them grind food. If you are setting up an outdoor bin pick a shady spot with sandy soil if possible. The sand will not only help your worms but, provides excellent drainage, as well.
TexasRedWorms.com starter farms are complete systems that contain everything you need in an established environment that includes bedding, food, red worms, and castings. We prefer to sell and ship worms this way, especially for beginners. We want to take the guess work out of starting your farm, and ensure your success as a red worm farmer.
It’s always the right time to add compost to your soil, and always a great time to get started composting with Red Worms. It’s Fall in Texas and the cooler weather is ideal for work outside and setting up your worm bed.
TexasRedWorms.com provides you the easiest way to start composting with Red Worms (vermicomposting) today. Our shoebox sized Starter Farm provides everything you need to produce nutrient rich castings for your plants and soil, and a thriving breeding brood of red worms (eisenia foetida) nature’s best composter.
Check out our latest ad on Craigslist or just give us a call 210-310-5046. If you are in the San Antonio or Livingston, TX area pick up can be arranged, or call for shipping information.
(Eisenia Foetida) red worms also known as red wigglers, manure worms, brandling worms, and tiger worms are native to Europe and found naturally in decaying piles of leaves and manure. Their adaptability and heartiness allow them to thrive in various climates and bins. They prefer temperatures from 40F-80F and are terrific composters.
Vegetable and fruit scraps, herbivore manure, yard clippings, paper products, used coffee grounds, and egg shells round out what I use to feed my worms. Avoid over heating worm bins caused by the composting process, and to speed up availability of bite sized food for the worms by feeding partially composted food scraps and manure. I feed my red worms from my compost bins. Variety and balance will keep your worms healthy and happy, and will ensure a balanced pH in your bins and will avoid worms trying to escape and other problems.
Scraps straight from the table can be added in small quantities to a section of an established bin when the worms have eaten through their previous feeding. For beginners and new bins I recommend feeding less course or already broken down matter.
This week we provided Texas Jumpers and set up bins at the Houston Zoo. There is no shortage of worm food and the kids visiting will soon get to see some Texas Red Worms “Texas Jumpers” up close. With the Houston heat, we decided Texas Jumpers would be the best choice for their location and […]
For a several days I had noticed my rugs pulled back and could tell some critter was rooting around in my worm beds. To figure out just what we were dealing with, my daughter and I set up our game cam to catch the rascal in the act. It was not a huge surprise after […]
Oh the good ‘ol days when a couple of dimes would get you something. Unfortunately we can’t give you this deal, but we’ve got some great Jumpers, Euros, and Red worms available for your fishing trip or enhancing your soil. Thanks to Uncle Corky and Sheryl for sending this great picture they found.
Here’s another example of a raised bed for worms. It’s next to the house and gets full shade. It’s next to a spicket for easy access to water and/or drip irrigation. I used some landscaping blocks to construct the borders and filled it with compost. After adding a Tx Jumper Starter, I cut a piece […]