Tag Archives: make your own worm bed

Flow through Worm Bin

3 Jan

Inspired by Bruce’s flow through worm bin design at wormcompostingblog.com, and Cassandra Truax’s podcast interview w/ “worm dude” Jerry Gach.  I had some plastic buckets laying around, and decided to build a couple for myself.

I cut out the hole w/ tin snips.

Holes were spaced 1.5″ apart to thread weed eater line through using a 1/8″ drill bit.

The first layer (6 sheets of damp newspaper).

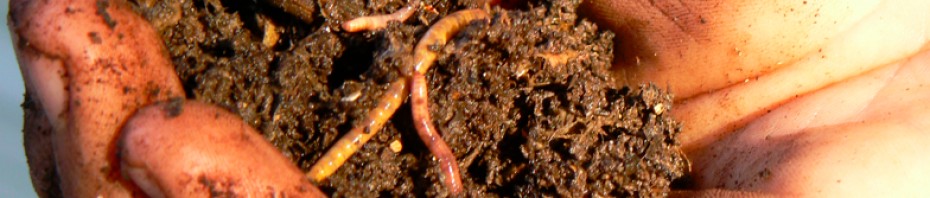
Next, I added some red worms, and layered some partially finished compost for bedding.

I will add food scraps to the top and cover with some cardboard.  The idea is that in a few weeks the worms will continue to work their way to the top and the finished vermicompost will flow through the weed eater line to be harvested from the bottom of the bin.

10 red worm egg experiment

3 Dec


Last week, as an experiment  I stocked  a starter bin with bedding and 10 red worm cocoons or egg sacs.  I would love to be able to see the little rascals hatch, but as you will see in the next post, counting these little critters can be pretty difficult.  Stay tuned.

Be sure to add a little sand to your Red Worm bin.

22 Nov

When setting up a new bin it is helpful to add a handful of sand.  This will help aid in the red worms digesting of food.  The sand will provide the necessary grit in their gullet to help them grind food.  If you are setting up an outdoor bin pick a shady spot with sandy soil if possible.  The sand will not only help your worms but, provides excellent drainage, as well.

TexasRedWorms.com starter farms are complete systems that contain everything you need in an established environment that includes bedding, food, red worms, and castings.  We prefer to sell and ship worms this way, especially for beginners.  We want to take the guess work out of starting your farm, and ensure your success as a red worm farmer.

More than half of U.S. trash could be fed to Red Worms.

20 Oct

According to the E.P.A. and  Yahoo news the average American family throws away 4.5 lbs of table scraps everyday.  Most of which could be eliminated if they had a few red worms.  57% of the trash America puts into landfills is red worm food.  12.7% food, 13.2% yard trimmings, and a whopping 31% paper. Not only could landfill space be greatly reduced, but think of the $ that could be saved if you started composting and red worming.  It’s fun, easy, and great for your yard, plants, and pocket book.

Outdoor Red Worm Farm

12 Oct

Red Worm farming is fun, easy, and helps you convert food wastes into rich natural fertilizer for your yard, plants, and garden.  Red worms are prolific and with time a handful of worms will grow exponentially.  I have build worm beds, pits, containers of all shapes and sizes and this weekend tried something new.  We had an old chicken coop that I converted into an outdoor bed.

This old chicken coop is a great spot for a worm bed.  Protected from direct sun and wind with a sandy soil base that will ensure good drainage.  I tilled up an area of about 10′ X 10′ and added a few loads of aged cow and horse manure to about 6″ depth.  Next, I ran a soaker hose over the bed and wet down the manure.  Last, I added about 2lbs. of bed run worms to start.

Things to consider when preparing a worm bed:

Protection from sun and extreme temperatures – (tin roof and three sided wall, and  at least 6 inches of bedding)

Moisture – Add depth of bedding and provide adequate watering. (6″ of aged manure and soaker hose, can cover with old carpet, plywood, or tarp)

Drainage – (sandy soil or sand base will keep water from collecting and drowning worms)

Bedding and Food- (partially broken down compost and aged manure are excellent for red worms)

10 minute Red Worm Setup

28 Jul

We had some local customers ask me to come help set up their worm bed.  I delivered the worms and helped them set up their own worm bed in about 10 minutes.  We found a nice spot in one of their flower beds, grabbed a plastic pot, some post hole diggers, and went to work.  I dug a hole large enough to bury the pot, placed the pot inside with the bottom cut out, put the worms in with bedding and food, and placed the lid on top.  This took about ten minutes and now Dave and Patty have their own TexasWormFarm.com worm bed.

DIY outdoor worm farm

17 Jul

A shady flower bed in well drained soil is a terrific place for a submerged bucket or flower pot bin to make your very own worm bed or pit.  Take a bucket or flower pot and and dig a hole deep enough for at least 1/2 to be underground.  Turn your pot or bucket upside down and cut a hole in the top to feed worms and harvest castings.  Your red wigglers will be able to stay cool in the Summer and warm in the Winter.

This bin was started a year ago and has been outstanding.  This bed made it through one of the coldest Texas Winters I can remember with temperatures hitting the mid teens on a couple of occasions.  I pulled the stone covering the top in early Spring, and was pleasantly surprised to see tons of baby red worms going to work.

Your flower bed will benefit from the castings deposited by your worms, and the leachate or run off will provide nitrogen rich nutrients as well.   The cover helps to protect worms from the elements, and helps keep the bin from drying out.  Send pictures of your worm bins, and share your ideas harrellindustries@gmail.com