Join TexasRedWorms.com at the San Antonio Botanical Garden this Saturday, July 23 at 10:00 am. We will be teaching how to set up your own red worm composting bin, and how to compost with worms. Learn how to turn your kitchen waste into rich worm castings that will condition the soil, and fertilize your plants naturally.
Composting with Red Worms
10 am—noon. Start turning your waste into rich worm castings for your garden and plants. Red Worm composting from TexasRedWorms.com will show you how to make your own worm bed and bin, how to feed, care for, and harvest your own steady supply of worm castings. Limit 30 participants. Fee: $20. To register, please contact Sasha Kodet at 210.207.3270 or sasha.kodet@sanantonio.gov.
Find an old plastic planter and cut the bottom out.
Find a well drained spot that is protected from afternoon direct sun. Dig a small hole big enough to bury the upside down container. Add some shredded paper products and some compost. Moisten your mix and add worms. Cover w/ a paver or stone to keep out critters, and protect from elements.
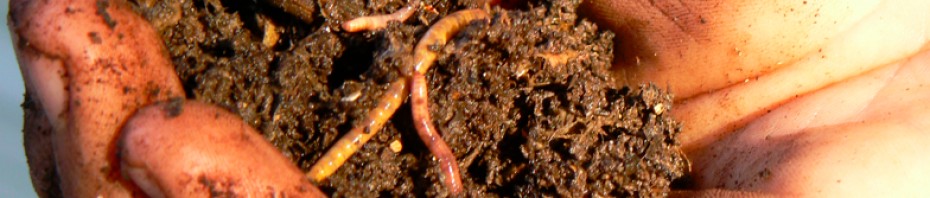
Depending on the amount of worms, a handful of kitchen scraps every week or so will be plenty to start. As your worms grow and reproduce they will require more frequent feedings. Do not over feed. Be patient and when the food is processed by the worms, add a few more kitchen scraps. Keep an eye on moisture. If kept out of direct sunlight, the food scraps will usually provide enough moisture for your worms. Worms like it wet because they breathe through their skin, but will drown in standing water.
Red Worms (Eisenia fetida), European Nightcrawlers (Eisenia hortensis), and African Nightcrawlers (Eudrillus eugeniae), are all excellent composters. These worms vary in size, w/ Red Worms being the smallest and possibly the least picky. Red Worms ease of care and ability to handle a wide range of temperatures make them a popular composting worm.
European and African Nightcrawlers are larger worms. European Nightcrawlers are popular w/ fisherman, due to size. You’ll find their larger cousin (Canadian Nightcrawler) in bait shops, as well. European Nightcrawlers can be used for composting, but thought to be less efficient than Red Wigglers or African Nightcrawlers.
African Nightcrawlers are a tropical worm that thrive in warmer climates, need to be kept in temperatures above 70F and will start to die off at 60F. They are the choice for many commercial worm casting producers that have access to climate controlled facilities. All three species or varieties can be prolific in the right conditions, and make excellent composting worms.
I had been thinking of building a feed trough style worm bed for some time. I found some plastic 55 gallon drums on Craigslist. My dad had some pine 2X4s cut from his saw mill, and we were in business. We began by cutting the 55 gallon plastic drums in half w/ a skill saw.
Materials: (2X4s, plastic 55 gallon drums, 3 inch wood screws, roofing screws, Thompson’s water seal)
Next we cut the 2X4s to border the open 1/2 end of the drum. We used 3″ screws to piece the wood together, and galvanized roofing screws to secure the barrel to frame. The height off the ground, we sized to about waist high for ease of use and for clearance underneath.
We had enough time and materials to build 3 bins. When finished, I sprayed some wood preservative on the untreated pine, then I added compost and worms. These bins are kept in a shaded area, and covered with plastic lids. I set up a bin for each species we raise (Alabama Jumpers, Red Worms, European Nightcrawlers)
Thanks to my dad (pictured) for the pine, and skilled labor.
Orlando Cortinas, Landscape Maintenance Technician for Villa Finale in the historic King William district in San Antonio, TX is doing some tremendous work on the museum grounds. He is bringing this historic property back to life, and working on some exciting organic methods to gardening and landscaping. Orlando has built a beautiful worm composting pit, and another composting bin for leaves, yard clippings, and food waste.
On my tour of the grounds, Orlando showed me his plans for a greenhouse, and compost tea brewer. Thanks Orlando, and the National Trust For Historic Preservation for your purchase with TexasRedWorms.com and the tour of your impressive property.
The first National Trust Historic site in Texas, this former home of preservationist and civic leader Walter Mathis was purchased in 1967. This home originally built in 1876 is now a museum, and a nearly 2 acre showcase along the San Antonio River on former Alamo farm lands.
Brian in San Antonio was kind enough to share some pictures of his worm tubes that he placed under the eves of his home and buried about 18″. He drilled several holes in the bottom 18″ buried portion of the pipe for drainage.
I just wanted to thank you for your help and encouragement starting worm composting. I went ahead and mixed 50-50 cow manure and peat moss in my tube and added a hand full of your red worms, and built a two bin system for the rest of the worms. two worm I added to my potted pineapple plant as an experiment. I figured I’d let the worms settle in for 3-7 days before adding vegetable mater. take a look at my pictures and let me know what you think. thanks again brother. BRIAN
Here are some more pics of his two bin system.
Above: drainage bin to catch excess moisture from worm composting bin.
Thanks to Brian in San Antonio for sharing your pics and ideas.
Let us know if you have any questions about composting w/ worms. Red Worms, European Nightcrawlers, and Alabama Jumpers available at TexasRedWorms.com for composting, gardening, and fishing. For more tips on what to do when you receive your worms check out our Care of Worms section.
After several weeks and hundreds of pounds, I have made a few modifications to my worm harvester. The first thing I did was replace the 1/2 inch hardware cloth w/ 1/4 inch screen throughout. The 1/4 inch screen keeps the majority of the worms out of the catch tubs and sends most worms to the end bucket along w/ the larger sized material. I still have to spend some time picking through the worm castings for eggs and baby worms. Using this method I have been able to speed up the process of separating worms from castings considerably.
Another change I made was adding a scrap piece of particle board to the front end to make loading easier and to prevent back flow. The only other modification was to tweak the angle slightly. I have the end pieces bolted so that I can adjust the height, also I can add blocks underneath to change the level.
Thanks to Chris from Arkansas who sent in a great video question via email.
My response:
Looks like a great spot to build a worm bed. (Pick a shaded area that can be kept moist, well drained, with decaying organic matter.)
You can do either:
If you bury your plastic bin, be sure the bottom of the tub is either removed or has lots of good sized drainage holes. You could also dump the contents of your plastic bin into the flower bed. For added protection from drying out, and critters you can cover with a few layers of damp newspaper, cardboard, straw, mulch, old carpet, or plywood.
Or you can do both:
Bury your red wiggler bin. Use the rest of the space for European nightcrawlers (Eisenia hortensis), or other species. By building up organic matter you can attract your native earthworms and/or supplement with some purchased worms. You can keep tabs on your red worm population, and watch the locals come to feed. I have done this in a couple of flower beds, and it seems to work well. The red worms will not stray and stay close to the food source. The earthworms (European nightcrawlers) tend to spread out more which is great for surrounding soil. Keeping your bed moist and full of organic matter will attract them and keep a fair amount close to home.
Hope that helps.
Red Worms– (Eisenia foetida) top feeders, composting worms, extremely prolific.
European Nightcrawlers– (Eisenia hortensis) deeper feeders, great for aerating lawn and garden, can also be used for composting.
Both Red worms and European nightcrawlers can be used to reduce household waste, accelerate the composting process, as well as, add nutrient rich natural fertilizer to plants, grass, and garden.
In this avocado I caught this red worm laying an egg. I grabbed the camera a little late, but you can see the worm and egg that was layed. Red Worms are prolific in good conditions. They are hermaphroditic and have both male and female reproductive organs. The worms will exchange fluid and can lay an egg every 7 days. The cocoons or eggs can contain 4-20+ baby worms.
You can save money, reduce waste, and benefit your plants with a red worm farm. It requires very little effort and space. Your TexasRedWorm starter farm can be kept under a sink, in a closet w/ no smell. Just add your coffee grounds, paper/ cardboard waste, fruit and vegetable scraps, and let the worms do the work. They will turn your trash into a rich natural fertilizer that you can add directly to your lawn or plants.
I decided to check in on a bin I had set up with only 10 red worm eggs, November 28, 2010. To my surprise, I found several worms quickly, and the largest was this 3.5″ monster pictured above. There was a visible clitellum, which means they have reached sexual maturity.
Red Worms will usually reach reproductive maturity in 2-3 months. Red Worms are hermaphroditic, and come equipped with both male and female reproductive organs.
This little experiment is proving out that your starting number of red worms is less important than providing the right environment for your worms.
Temperature: 40F-80F
Moisture: Damp but not wet- think of a wrung out sponge
Feeding: Simulate their natural environment (manure piles, decaying leaf piles) Feed in one part of bin when food is gone. Worm food includes: vegetable scraps, egg shells, coffee grounds, herbivore manure.
This week we provided Texas Jumpers and set up bins at the Houston Zoo. There is no shortage of worm food and the kids visiting will soon get to see some Texas Red Worms “Texas Jumpers” up close. With the Houston heat, we decided Texas Jumpers would be the best choice for their location and […]
For a several days I had noticed my rugs pulled back and could tell some critter was rooting around in my worm beds. To figure out just what we were dealing with, my daughter and I set up our game cam to catch the rascal in the act. It was not a huge surprise after […]
Oh the good ‘ol days when a couple of dimes would get you something. Unfortunately we can’t give you this deal, but we’ve got some great Jumpers, Euros, and Red worms available for your fishing trip or enhancing your soil. Thanks to Uncle Corky and Sheryl for sending this great picture they found.
Here’s another example of a raised bed for worms. It’s next to the house and gets full shade. It’s next to a spicket for easy access to water and/or drip irrigation. I used some landscaping blocks to construct the borders and filled it with compost. After adding a Tx Jumper Starter, I cut a piece […]