Tag Archives: red worm bin

What to feed red worms

30 Oct

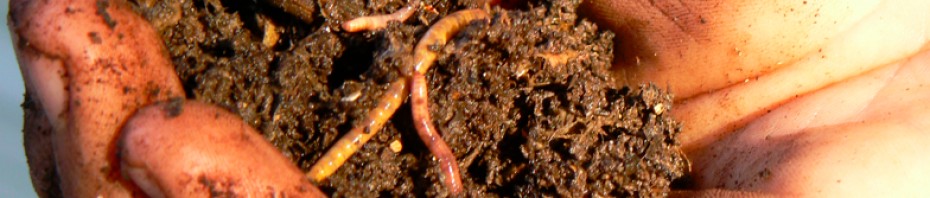
(Eisenia Foetida) red worms also known as red wigglers, manure worms, brandling worms, and tiger worms are native to Europe and found naturally in decaying piles of leaves and manure. Their adaptability and heartiness allow them to thrive in various climates and bins. They prefer temperatures from 40F-80F and are terrific composters.

Vegetable and fruit scraps, herbivore manure, yard clippings, paper products, used coffee grounds, and egg shells round out what I use to feed my worms.  Avoid over heating worm bins caused by the composting process, and to speed up availability of bite sized food for the worms by feeding partially composted food scraps and manure.   I feed my red worms from my compost bins.  Variety and balance will keep your worms healthy and happy, and will ensure a balanced pH in your bins and will avoid worms trying to escape and other problems.

Scraps straight from the table can be added in small quantities to a section of an established bin when the worms have eaten through their previous feeding.  For beginners and new bins I recommend feeding less course or already broken down matter.

Texas RedWorms visits Floresville Elementary

26 Oct

Texas Red Worms.com spent lunch today with 300 3rd graders from Floresville Elementary School.  We talked about composting, red worms, and how they could become red worm farmers.  The students have been composting for about a month. Each of the eight 3rd grade science classes will have their own redworm farm to help in their composting process.  Students are learning how to reduce waste and turn trash into nutrient dense castings they can add to plants and landscape around their homes and school.

The students asked some great questions and are eager to begin worm farming (vermicomposting).  Thanks to a bunch of smart, and well behaved students, Mrs. Davis, and the rest of the 3rd grade science department at Floresville ISD.

More than half of U.S. trash could be fed to Red Worms.

20 Oct

According to the E.P.A. and  Yahoo news the average American family throws away 4.5 lbs of table scraps everyday.  Most of which could be eliminated if they had a few red worms.  57% of the trash America puts into landfills is red worm food.  12.7% food, 13.2% yard trimmings, and a whopping 31% paper. Not only could landfill space be greatly reduced, but think of the $ that could be saved if you started composting and red worming.  It’s fun, easy, and great for your yard, plants, and pocket book.

Outdoor Red Worm Farm

12 Oct

Red Worm farming is fun, easy, and helps you convert food wastes into rich natural fertilizer for your yard, plants, and garden.  Red worms are prolific and with time a handful of worms will grow exponentially.  I have build worm beds, pits, containers of all shapes and sizes and this weekend tried something new.  We had an old chicken coop that I converted into an outdoor bed.

This old chicken coop is a great spot for a worm bed.  Protected from direct sun and wind with a sandy soil base that will ensure good drainage.  I tilled up an area of about 10′ X 10′ and added a few loads of aged cow and horse manure to about 6″ depth.  Next, I ran a soaker hose over the bed and wet down the manure.  Last, I added about 2lbs. of bed run worms to start.

Things to consider when preparing a worm bed:

Protection from sun and extreme temperatures – (tin roof and three sided wall, and  at least 6 inches of bedding)

Moisture – Add depth of bedding and provide adequate watering. (6″ of aged manure and soaker hose, can cover with old carpet, plywood, or tarp)

Drainage – (sandy soil or sand base will keep water from collecting and drowning worms)

Bedding and Food- (partially broken down compost and aged manure are excellent for red worms)

Fish, Chicken, and Red Wigglers

15 Sep

The main attraction for red worms is composting.  Red worms are also popular as bait for fishing, and as food for your pets.  Yes, feeding your cichlids (aquarium fish), bearded dragons, and other reptiles can benefit from your red wigglers.  They are prolific and can save pet lovers frequent trips to the pet store to buy food for pets.

A red worm farm is a natural choice to compliment your chicken farm.  Worms will flourish with the chicken litter and everyone knows chicken love to eat worms. Feed prices are going through the roof, and supplementing red worms in your egg layers’ diet can benefit your birds and pocket.

Red worm reproduction.

8 Sep

A happy and healthy worm bin produces lots and lots of worms.  Red worms can reproduce quickly laying an egg sac or cocoon every 7-8 days.  Each egg sac can produce 3-20 hatchlings who reach sexual maturity in two months with a lifespan of up to 15 years!  A healthy red worm population can double in a hurry.

Keeping a happy worm bin means the right amount of food (not overfeeding).  The right amount of moisture– moist but not wet (wrung out sponge).  The right temperature, and the right pH.  If your bin is too acidic add some crushed egg shells to balance.

Raising red worms is a fun and easy way to recycle, compost food waste.  With a little practice and seeing how your worms respond, you will be raising lots of red worms in no time.

Compost tea results

16 Aug

I had mentioned in my previous post that positive indicator for my compost tea application was to rid a section of our hay patch of ants.  The spot of concern has been infested for a few years with “town ants” or Texas leaf cutter ants.  Town ant hills were sprinkled throughout a 20 yard X 20 yard area.  The operative word being “were” because two weeks later the ant hills are vacant.

Beneficial microbes in compost tea are parasites to ants, fire ants, fleas, ticks, and chiggers.  I had had success in my lawn in getting rid of some of these pests with compost tea, but never on this scale.  This alone is encouragement enough for us to continue compost tea applications, and we’re looking forward to the next batch.

Compost Tea Party part 3

11 Aug

We ended up with two batches.  In both we used @80 lbs of finished compost (40lbs in each of 2 mesh laundry bags that we purchased for $1.87 at Wal-Mart).  Both batches we used 500 gallons of well water, and aerated with our 1600 gallon rated Aquascape 4 pond aerator.  Where we tinkered a little was on the food source (molasses + brown sugar) and brewing time.  1st batch we used two jars of unsulphured molasses and 1 lb of brown sugar and 24 hours of brewing time.  The color was light brown and the smell was pretty much neutral with a hint of earthiness to it.  Batch #2 was brewed for 36 hours and was fed 4 jars of molasses and 1 lb of brown sugar.  The smell on batch #2 was the same faint earthy tone with a hint of sweetness from the molasses.  The color was a shade darker brown than batch #1.

One thing we will be judging the success of the compost tea application on is in the reduction of ant hills.  We don’t have a big fire ant problem, but one hay patch has several ant hills in an area.  Adding beneficial microbes began for me as a way to control fire ants, grubs, and other pests in my yard, and have had some terrific results. We’ll keep you posted.

Why are all my worms at the top of the bin?

10 Aug

I had someone ask the other day about why there worms were lined up at the top of their bin?

Worms should be dispersed throughout your bin when conditions are right.  So chances are there might be an issue with your bin if you see this.  Red worms like it moist, but don’t drown them.  If the bin is outdoors make sure the soil is well draining, and that rain will not collect.  Temperature is the other big factor in my experience.  See The right temperature for worms for more info.

For an in depth look at the 3 rights of worm farming check out this link.

10 minute Red Worm Setup

28 Jul

We had some local customers ask me to come help set up their worm bed.  I delivered the worms and helped them set up their own worm bed in about 10 minutes.  We found a nice spot in one of their flower beds, grabbed a plastic pot, some post hole diggers, and went to work.  I dug a hole large enough to bury the pot, placed the pot inside with the bottom cut out, put the worms in with bedding and food, and placed the lid on top.  This took about ten minutes and now Dave and Patty have their own TexasWormFarm.com worm bed.