Tag Archives: san antonio red worms

Make your own worm pit.

25 Mar

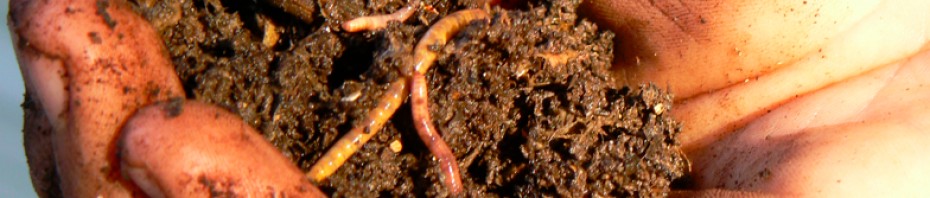
Due to a lack of morning or afternoon sun, I had a difficult time growing anything in this flower bed.  What began about three years ago as a compost pile would be converted into a worm pit.

First, I dug out some of the existing soil that was mostly clay and caliche (rock).  I dug out about 18″ and began filling w/ organic matter.  I began adding coffee grounds, horse and cow manure, grass clippings, leaves, and other vegetable waste.  I didn’t add worms until about this time last year.  Adding the worms at this point,  gave the organic matter plenty of time to break down, and provide a rich environment for the worms.  The worms have flourished and every handful yields a good many worms.  I have continued to add compost material, and water as needed to keep the bed moist.  Over the last month or so, the live oaks have given us a ton of leaves, and I have added them to the top layer as a mulch.   You can use newspaper, hay, or other kinds of mulch to keep the worm bed from drying out.  A layer of mulch will also keep the worms cool in the summer and warm in the winter.  This particular worm pit I am raising Alabama Jumpers, but is suitable for other species, red worms, European nightcrawlers, and African nightcrawlers.

Harvesting Worm Castings w/ a Homemade Sifter

23 Mar

For large jobs of sifting worms from castings or compost I use my Texas Worm Harvester, but for smaller jobs I have built a small box sifter.  With some scrap materials,  and the left over 1/4 inch wire mesh I had I put together this sifter.  I have also seen where other worm farmers use 1/8 inch screen, for my use I have found the 1/4 inch to do just fine.  Separating worms from castings using this or the harvester method is the first step I take and removes most of the worms are course unprocessed organic matter.  I do spend time picking out tiny worms and eggs, but losing a few is not a big deal.  Here is a picture of a tiny hatchling that I found while harvesting castings.  As you can see, or maybe not, these little guys are hard to find.  This little thread of a worm was wiggling which made him easier to see.

Compost Tea Time

18 Mar

This afternoon I began brewing up about 70 gallons of compost tea with worm castings I recently harvested.  In about 12 hours my brew will be ready to apply to my plants and yard.  If you are in the San Antonio area, and can pick up, I’ll be giving a gallon of actively aerated vermicompost tea away with a TexasRedWorm.com purchase.  An application of compost tea will add life to your soil with beneficial micro organisms that will fight disease and pests, as well as, boost your plants growth.  Active aeration prevents harmful anaerobic bacteria and other non-beneficial microbial activity.  Applying compost tea within a few hours is best, after a few hours the brew begins to go anearobic.

Here’s a link for a recipe.

Be aware of store bought compost tea products claims that are sitting on the shelf.  These products will not be aerobic and will not contain many of the benefits (beneficial microbes that require Oxygen) that are associated with actively aerated compost tea.

Worm Castings: the Best Fertilizer for the Garden

16 Mar

Spring time means it’s time to plant.  The whole family pitched in helping my parents with the garden. My niece and dad are pictured above planting the watermelons.  I supplied the worm castings, and a little hoeing to help out.

Worm castings are one of the benefits to raising your own worms.  Composting food waste with worms will give you your own organic fertilizer.  All natural fertilizer that strengthens roots of plants, improve disease resistance, and makes better tasting vegetables.  Check out these links for additional information and benefits from gardening with worm castings.

wormcompostingblog.com

wormsetc.com

tastefulgarden.com

We’ll be looking forward to some more tasty vegetables from the garden this year.

Texas Worm Harvester (part 4)

10 Mar

After several weeks and hundreds of pounds, I have made a few modifications to my worm harvester.  The first thing I did was replace the 1/2 inch hardware cloth w/ 1/4 inch screen throughout.  The 1/4 inch screen keeps the majority of the worms out of the catch tubs and sends most worms to the end bucket along w/ the larger sized material.  I still have to spend some time picking through the worm castings for eggs and baby worms.  Using this method I have been able to speed up the process of separating worms from castings considerably.

Another change I made was adding a scrap piece of particle board to the front end to make loading easier and to prevent back flow.  The only other modification was to tweak the angle slightly.  I have the end pieces bolted so that I can adjust the height, also I can add blocks underneath to change the level.

Outdoor worm bed question?

8 Mar

Thanks to Chris from Arkansas who sent in a great video question via email.

My response:

Looks like a great spot to build a worm bed. (Pick a shaded area that can be kept moist, well drained, with decaying organic matter.)

You can do either:
If you bury your plastic bin, be sure the bottom of the tub is either removed or has lots of good sized drainage holes.  You could also dump the contents of your plastic bin into the flower bed.  For added protection from drying out, and critters you can cover with a few layers of damp newspaper, cardboard, straw, mulch, old carpet, or plywood.
Or you can do both:
Bury your red wiggler bin.  Use the rest of the space for European nightcrawlers (Eisenia hortensis), or other species.  By building up organic matter you can attract your native earthworms and/or supplement with some purchased worms.   You can keep tabs on your red worm population, and watch the locals come to feed.  I have done this in a couple of flower beds, and it seems to work well.  The red worms will not stray and stay close to the food source.  The earthworms (European nightcrawlers) tend to spread out more which is great for surrounding soil.  Keeping your bed moist and full of organic matter will attract them and keep a fair amount close to home.
Hope that helps.
Red Worms– (Eisenia foetida) top feeders, composting worms, extremely prolific.
European Nightcrawlers– (Eisenia hortensis) deeper feeders, great for aerating lawn and garden, can also be used for composting.
Both Red worms and European nightcrawlers can be used to reduce household waste, accelerate the composting process, as well as, add nutrient rich natural fertilizer to plants, grass, and garden.

European Nightcrawlers now available

23 Feb

European Nightcrawlers are now available at TexasRedWorms.com. They can be used for composting just like the red worm, but are a bit larger, stronger and are deeper tunnelers than the top feeding red worm.  Red Worms prefer piles of moist decaying organic matter (leaves, manure).

There are many different species of earthworm ranging in size and climate, most can be classified in one of two larger camps. The first being the deeper dwelling tunnelers (European Nightcrawler), and secondly the top feeding composters (Red Worm).  A lot of biologists claim that all earthworms have been introduced, from settlers bringing them in potted plants and so forth.  I have a hard time with that, but guess it could be possible.

Care for both worms is similar and they can even co-habitate. The nightcrawlers are able to be added directly to your garden, flowerbed, or lawn, while the red worms would not fare so well.  The red wigglers are more prolific smaller worm that will not scatter like the European nightcrawler, or Alabama Jumper.  Both are well suited for composting and bin raising, and care is identical.

European nightcrawlers are typically what you will find at bait shops, and grow thicker and longer than the red wiggler.  Both are active on a hook and will get the fish to bite.

Keys to worm farming success.

14 Feb

A proper set up, and a little planning is all you need to be a successful worm farmer.  In no time you’ll be making more bins, and harvesting valuable castings for your soil and plants from garbage that your family produces.  Red worms are rapid breeders, and can lay an egg every 7 days.  Because they breed so fast in good conditions, focus on their environment, and you will have more worms than you know what to do with.  I started 4 years ago with a medium sized drink cup worth of worms that wasn’t even full.  I sputtered for a bit until I dialed in the right conditions for their bin.  Soon after I got it right and 1 bin became 2 and there is no telling how many worm beds and bins I have started.  So how many worms you start with is not important, but how you start is critical for success.

On another note, I harvested the castings from one of my starter (shoebox size) farms this weekend that I started on 11/28/10 with 10 eggs.  This experiment proved that a healthy bin will produce great results.

For first time worm farmers I recommend my starter farm $40 that will give you a headstart on producing castings and more worms than just purchasing a pound of worms. An established environment with reproducing worms from egg to adult, and will out produce a worm purchase alone.  Worm farming is easy, but you must get a few things right.  The right kind and amount of food, the right temperature, the right moisture, and the right amount of room.  BIns should mimic their natural environment, a cool, dark, moist space with decaying organic matter.

The TexasRedWorms.com starter farm in most cases,will need to be split in about a month.  Splitting bins when they grow out of their current one is important, because when conditions are right the only limit to the worms reproduction is space and available food.

I recommend keeping the starter bin as a breeding bin, and starting new bins from your harvest.  When you have a bin that is producing, you can then experiment with other set ups (larger bins, worm beds, pits, trenches, worm towers,and more) .

Have fun, and Happy Valentine’s Day.

Red Worm Egg Production

27 Jan

In this avocado I caught this red worm laying an egg.  I grabbed the camera a little late, but you can see the worm and egg that was layed.  Red Worms are prolific in good conditions.  They are hermaphroditic and have both male and female reproductive organs.  The worms will exchange fluid and can lay an egg every 7 days.  The cocoons or eggs can contain 4-20+ baby worms.

You can save money, reduce waste, and benefit your plants with a red worm farm.  It requires very little effort and space.  Your TexasRedWorm starter farm can be kept under a sink, in a closet w/ no smell.  Just add your coffee grounds, paper/ cardboard waste, fruit and vegetable scraps, and let the worms do the work.  They will turn your trash into a rich natural fertilizer that you can add directly to your lawn or plants.

Planting Blueberries w/ worm castings

19 Jan

I just received my blueberry shipment yesterday, and was anxious to plant.  I ordered 14 blueberry 2-3 foot tall plants (climax, premier, brightwell, and delight varieties).   Blueberries like a little acidity and do very well in the southeast Texas well drained sandy soil.  We will put most of the plants in the ground in Livingston, but  I wanted to have a couple here in San Antonio in pots.

My blueberry potting mix: Sandy southeast Texas soil, peat moss, worm castings, and finished compost.

For the two plants I split 4 lbs of Texas red worm castings that I placed near the roots, not mixed like the other components.  Worm castings are an outstanding fertilizer to support root growth and development.

These plants should produce a few berries early this Summer, but we will pick them early to yeild a better crop in the second year.

I chose a large container, and repurposed an empty syrup tub that we use to feed cows.